Um, WordPress, I don’t know how to tell you this but… YOU ARE TOO SLOW!
I have been using WordPress every day for over 7 years now and I love it, but sometimes it feels like I’m pushing an elephant up the stairs trying to get pages to load quickly.

Who can blame it, really? WordPress is a powerful content management system, but we load it up with plugins, images, scripts, buy cheap hosting and then wonder why it takes forever to load.
But, WordPress, there is hope! By coming up with a fool-proof speed audit, I learned how to speed up WordPress without spending a fortune on hosting or plugins.
Actually, I spent $0, and my site went from loading in almost 10 seconds, to under 1 second. That’s 10 times faster, and I was already using some caching and CDNs before I started.
Before:

Almost 10 seconds to fully load the page.
After:

Page now loads in under 1 seconds.
Pretty cool, huh?!
Want to speed up your WordPress website like I did? I’ll walk you through every step I took to make WordPress load faster.
Table of Contents
You don’t need to buy any WordPress speed plugins
Unlike all of the other WordPress speed tutorials I found online, I ran this experiment without spending a single dollar because a) I want the results to be of use to anyone with a WordPress site, and b) I’m cheap. Also c) I’ve seen WordPress sites that spend a ton on hosting STILL end up slow so this is not a quick-fix “throw money at it” problem to solve.
Sure, some of my speed tricks can be done with premium plugins like perfmatters and WP Rocket, but if you have a little time and patience, you can achieve the same results for free with some free plugins and a little code editing.
Why does WordPress speed matter?
WordPress speed matters because your website will be used by real people and people prefer to use websites that load quickly. Don’t you?
A fast WordPress site will give you a competitive advantage over other, slower websites, because people will want to use it. And Google might notice that, too.
Oh yeah, SEO. WordPress is a great starting point for SEO on any website, but speed plays a big role in organic search engine success. In projects I’ve worked on, improving site speed has led to a reduction in bounce rate and other metrics that correlate to stronger rankings.
Since 2018, Google has used page speed as an official ranking factor for mobile searches, which now means all searches since they have used mobile-first indexing since 2019. Google will also start using its Core Web Vitals speed benchmark to rank sites in the near future.
If you think paying for traffic to your website from Facebook or Google ads means you can get away with a slow-loading site, think again. You’re paying for clicks that might bounce back!
Whether you’re using WordPress or any other CMS (content management system), you should still try to make your website as fast as you can. Even shaving milliseconds off your load times can lead to huge gains in terms of traffic and conversions, especially on mobile.
To sum up, here are the benefits of a faster WordPress website:
- better UX (user experience)
- lower bounce rate
- SEO (search engine optimization)
- optimized for mobile and voice search
- save time whenever you use the admin dashboard to update your website!
How to perform a WordPress speed test
Before you start buying into quick fix plugins, you need to look under the hood of your WordPress website to find out what’s making it so slow and perform a site speed audit.
In the past, I’ve used tools like Google’s Page Speed Insights and Pingdom to test the speed of my WordPress websites. While these tools are ok for a basic overview of your site’s performance, to get more actionable insights, we’re gonna need a bigger boat. Or, at least, WebPageTest.
For some strange reason, most people use their homepage to test the speed of their website. Unless your homepage is your main landing page, don’t bother. I recommend you run a test on your most important page type(s) (for me, a blog post) to get representative results.
How to use WebPageTest to test WordPress performance
WebPageTest lets you select several variables before running a test. The standard advanced testing configuration is fine for most sites, but I change the test location to New York and the browser to Chrome, to align better with my users (check Google Analytics to find the devices/locations of your users).

Be patient – the test will take a few minutes to complete. Time to grab a coffee or check your email!
I ran the test on a long-form blog post with lots of images (a post on Cryptocurrency SEO).
As standard, WebPageTest will run 3 different load tests of your page, one after the other. I focusing on the First Run test because it represents how a page performs for new visitors (most of my audience). The subsequent runs will show how your page performs when a browser has already visited your page – good to check how well browsers cache your assets and important if your website has a lot of page views per visitor (especially for ecommerce).
Here’s the speed data table you’ll see once the test is complete:

We’re interested in a couple of key site speed metrics:
Load Time – the total time it takes for the page to fully load to a Document Complete status.
My load time is 9.933 seconds – otherwise known as really damn slow. Under 2.5 seconds is recommended.
First Byte – also known as TTFB (Time to First Byte), the time it takes before the first byte of data is transferred.
My TTFB is 3.371 seconds. That’s really, really slow. It should be less than 500ms (half a second), but Google recommends 200ms as an ideal. Yikes.
Bytes in – When the page is fully loaded/document complete, ‘Bytes in’ is the total size of the web page.
My blog post was 2,532 KB, or about 2.5MB at the document complete stage. That’s quite large, I’d like to get it under 1MB.
Requests – the total number of http(s) requests. Document Complete requests is the number of requests it takes to fully load all of your web page content, and Fully Loaded requests is the total number of requests, both from your domain and third parties (things like Google Analytics scripts).
My page made 47 requests, and 232 when fully loaded. No wonder it is slow! The lower the number of requests (generally), the faster the page will load.
By clicking the “Domains” tab, you will see some more stats:
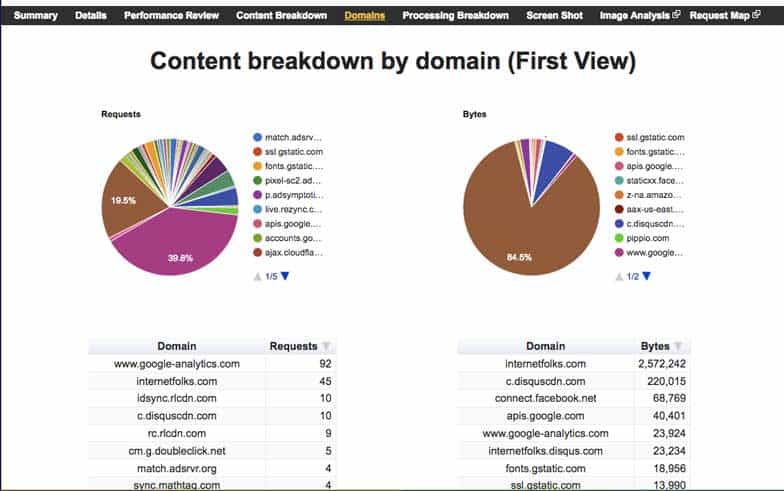
Content breakdown by domain – The number of requests and bytes from each domain.
You can see that the majority of requests were coming from Google Analytics, and that around 0.5MB of data was coming from external scripts.
Click the “Content Breakdown” tab to see more:
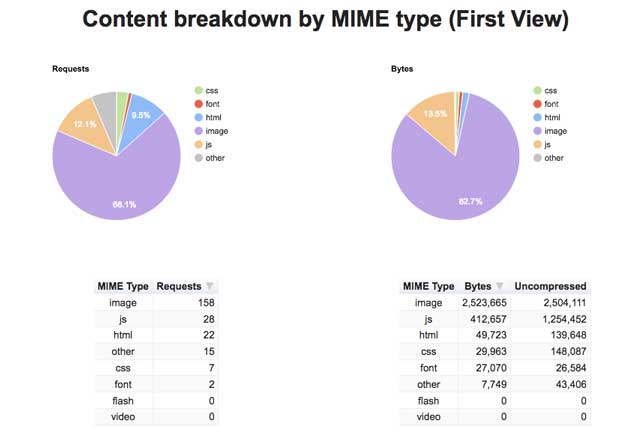
Content breakdown by type – the number of requests of bytes from each MIME (Multipurpose Internet Mail Extensions) type.
My page is very image-heavy – images make up 158 requests and 2.5MB in size. But there’s plenty of java, too. This tells me that reducing the size/loading of images and combining/removing JavaScript will help the page to load quicker.
From the “Summary” tab, you can find the Waterfall View – the most important part of the speed audit.

Waterfall view – shows the order that requests were made on the page, and how long they took to load.
Each item in the waterfall view represents a request. The color of each bar gives you its MIME type (image, javascript etc), and the length of the bar indicates how long it took to load. The loading time in milliseconds is also shown.
The solid blue vertical line represents the “Document Complete” stage – the time when the page contents are fully loaded but additional scripts (like analytics) might still be loading in the background.
Focus on requests that come before the blue line – reducing the load time of these requests will make the page usable faster. Click on any request to view more details. Start with requests that load before the blue line and take a long time (the widest bars). The detailed view will let you know where the request came from.
Now you’ve got all this data about how your website loads, it’s time to delve into the details and start making changes to WordPress to speed things up.
The myth about too many plugins
If you’ve read any of those listicle posts about “how to speed up WordPress”, you’ll know that people say having too many plugins will slow your WordPress site down, and you’ve got to delete plugins to speed it up again.
That’s just plain wrong.
Plugins do not always slow your WordPress site down. A site with 1 plugin will not always be faster than a site with 25 plugins. I increased the number of plugins on this site and made it 10 times faster.
Plugins (and themes) that are poorly coded or use a lot of server power or MySQL queries could make your WordPress site slow, and that’s why running a thorough site speed test with WebPageTest will let you know if any plugins are weighing you down.
Plugins to avoid
There are some popular plugins that are known to slow WordPress sites down (especially if you use cheap shared hosting). Ones to watch are related posts plugins, post stat plugins and on-site backup plugins. Plugins that need to continually scan your site, like Broken Link Checker, are also widely condemned.
You can learn a lesson from the optimized WordPress hosts – if they outright ban plugins because of their negative impact on website performance, you probably don’t want to use them yourself.
Here’s a list of all the banned plugins from major web hosts: WP Engine, Kinsta and Hostgator.
If you have power-hungry plugins slowing you down, you might be able to switch to a different plugin to achieve the same result, or use a third party service to replace it. For example, instead of using the Broken Link Checker plugin, you can scan your site for broken links using Screaming Frog.
Quick wins: delete plugins and scripts you don’t need
The easiest, cheapest and quickest thing anyone can do to speed any WordPress website is to delete plugins and scripts that add a lot of bytes or requests to the page.
From my speed audit above, I could see that the comment plugin Disqus is significantly adding to my site load time.
Test the impact of your plugins by disabling them and then re-testing your site’s loading time, byte size and number of requests.
Here’s the impact of Disqus on my site:
Before (using Disqus):

After deleting the Disqus plugin:

You can see that by deleting Disqus, I shaved 2 seconds from my page’s load time, and reduced the number and size of requests.
Scripts can also slow down WordPress, for example Google Analytics scripts and Google Fonts scripts. You can see which scripts are being loaded on your WordPress site in the Waterfall View on WebPageTest.
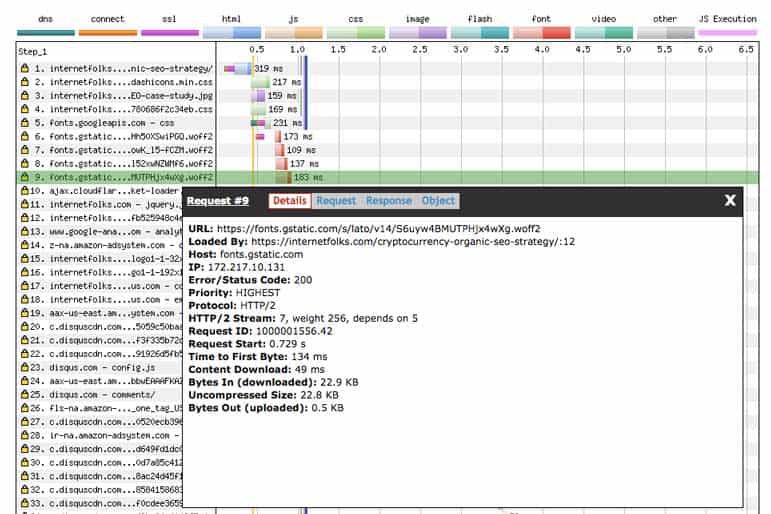
Google Fonts are loaded early on, before the Document Complete stage, so removing them will help make your site faster. I am currently using Montserrat (a Google font), but saw from the Waterfall view that my page was also loading the script for Lora, which I am no longer using. Deleting the unnecessary Google Font script will shave 330ms from my page load time. Every little bit counts!
How to optimize image size and loading methods
For most WordPress sites, images will be some of the largest files that need to be loaded on each page.
There are a few things you need to do to optimize images on WordPress so that they load as quickly as possible:
1. Compress images to make them as small (in bytes) as possible
The smaller an image is (in bytes), the faster it will load. If you’re uploading images to WordPress, re-size them before uploading so they are no larger than you need them to be. Convert PNG images to JPEG to achieve better compression.
If you have an existing library of images, use an image plugin like Smush (free) to compress existing images and new ones when uploaded. I’ve been using Smush for years, so my images are already quite small – not much room for improvement for me, but worth doing if you’re not already.
Recently, I’ve switched to using ShortPixel to compress images and serve them in WebP format. WebP files are 25- 34% smaller than comparable JPEG images and are recommended by Google. Here’s a tutorial on how to use WebP images with WordPress.
ShortPixel gives you 100 image credits for free each month, which will be enough for most small websites to get started with. If you have a large existing library of images or upload a lot of content, you can buy cheap extra image credits. The ShortPixel WordPress plugin will help you set it all up.
2. Lazy load images on long pages

Lazy loading is a process of deferring image loading until a user scrolls down the page.
For example, my Cryptocurrency SEO blog post contains 23 images. Those images have a combined size of 2.5MB. It’s a long page (over 3000 words), so it takes a reader a while to reach the images further down the page. But, crucially, the user has to wait for all the images to load before reading anything.
What a waste of time!
Instead of making users wait for all images to load, lazy loading allows you to load other page assets before images below the fold (the unseen part of the page). When the user scrolls, the images will load and appear.
To set up lazy loading, I installed the BJ Lazy Load plugin (free), which uses JavaScript to defer image loading. Yes, this an additional script to your WordPress site, but it’s worth it because images make up so much of the page size.
Here’s how quickly my blog post loaded with lazy loading enabled:

Note: If you’re using lazy loading the Document Complete and Fully Loaded times will not take into account images further down the page.
Before using lazy loading, the page was taking almost 10 seconds to load – lazy loading made my site load 2x quicker.
You can see why by looking at the Content Breakdown in WebPageTest:
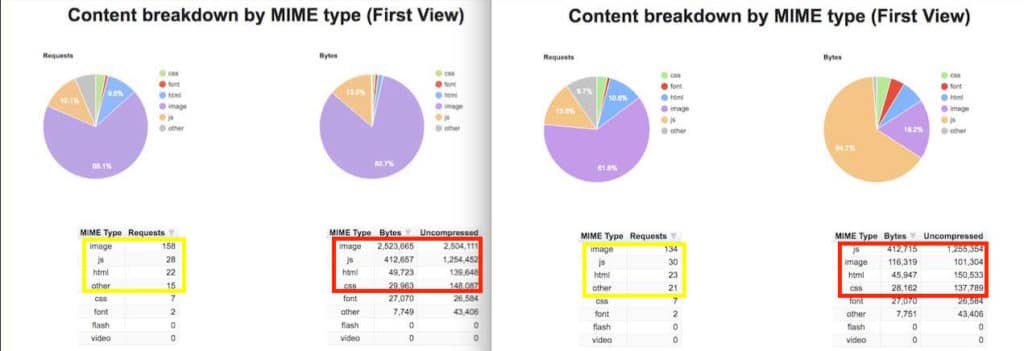
With lazy loading active, the number of image requests reduces from 158 to 134. Image size reduces from 2,523,665 bytes (2.5MB) to just 116,319 bytes (0.12MB).
The BJ Lazy Load plugin did add some additional JavaScript and other scripts to the site, but these did not seems to affect loading times.
You can also lazy load images by using the free Autoptimize plugin, which will also perform a bunch of other speed optimizations discussed in this article. Go to Dashboard > Settings > Autoptimize > Images and check the “Lazy-load images” option.
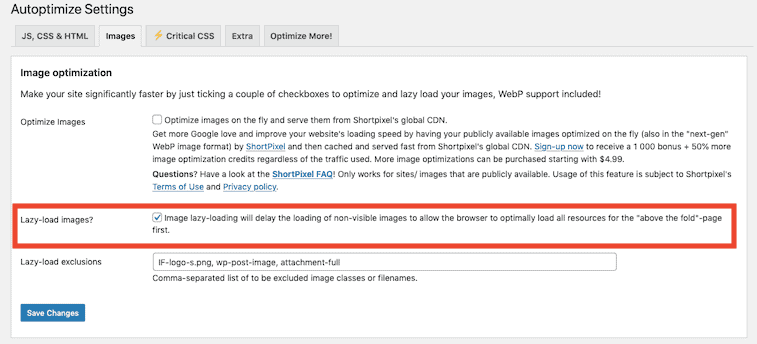
Don’t rely exclusively on lazy loading using JavaScript for speed optimization because if users are blocking java, they will not receive lazy loading; make sure your images are also compressed for maximum benefit.
One important thing to remember: you can also add image classes to make sure that essential images are loaded immediately (like anything above the fold). Just configure a tag like “not-lazy=”1″ in BJ Lazy Load and add to any image to skip lazy loading. Autoptimize lets you add lazy load exclusions.
Note: WordPress is working on adding lazy loading to the WordPress Core, meaning that it can be used without additional code or plugins in the future.
Don’t assume a CDN will make your images load faster
I’ve read a lot of advice about WordPress speed, and most of it recommends getting a paid CDN service like KeyCDN (which I’ve tested) or StackPath (formerly MaxCDN) to host your images for you.
When you’re using an image CDN, requests made when your web page is loading will come from a URL like cdn.yourdomainname.com/image-name instead of yourdomainname.com/image-name. This means the request is coming from a different server to the rest of your website content, but it doesn’t mean it will be any faster.
For example, look at the loading times for a random page on WordPress site WPBeginner:
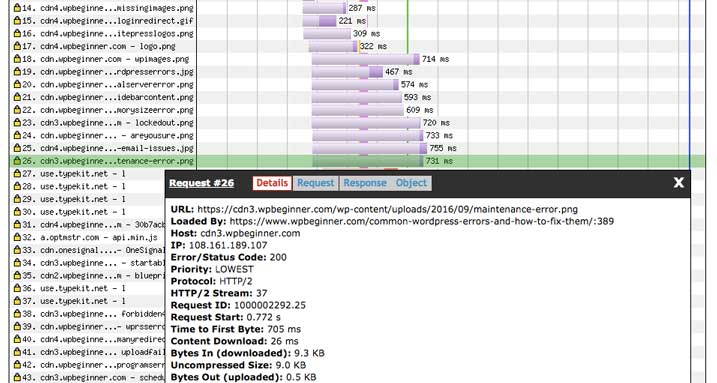
Images from the CDN (it uses MaxCDN) are taking a long time to load, and they’re not even large. The detail pane above shows a 9.3KB image taking almost three quarters of a second to load. That’s sloth pace!
A CDN will not always make your images load quickly. Good image compression and lazy loading are much more reliable way to make pages load faster.
Load JavaScript asynchronously
While scripts might slow our sites down, we also need them and their functionalities. I like using Google Analytics, for instance, so I don’t want to remove it just to make my site faster. But there is a way to make Analytics and other scripts load faster – asynchronous loading.
Asynchronous JavaScript loads multiple scripts at the same time – the opposite of synchronous loading, which means loading scripts in order, one at a time.
By loading all of your scripts at the same time, they should load much quicker because there’s no waiting time. This is particularly the case if your WordPress site is calling javascript from a number of different external sources, like Google Analytics or Google Fonts.
If you’ve run a website speed test on Google Page Speed Insights, you’ll probably know you have to “eliminate render-blocking JavaScript“.
Removing render-blocking JavaScript will allow above-the-fold page content (like images and text) to load without waiting for JavaScript. If your WordPress site needs JavaScript to load before it can function, then render-blocking JavaScript is ok. But, if, like me, your website only uses JavaScript for additional functionality, then blocking render-blocking java is a great way to speed up your website.
I used the free plugin Async JavaScript to easily get my JavaScript optimized. Select the quick “Apply Async” setting:
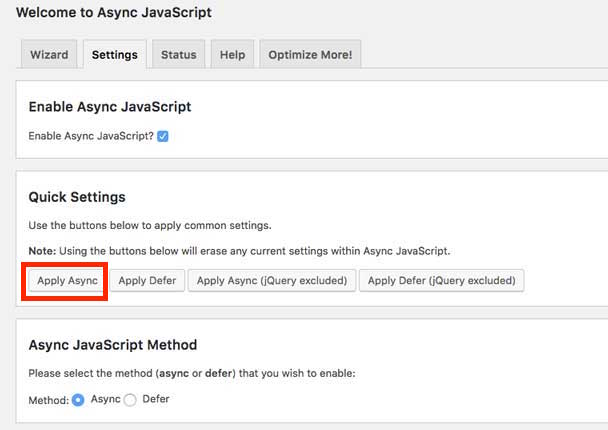
For extra speed points, you can also change your Google Analytics tracking code to the async version, which Google states will help speed up your site:
The alternative async tracking snippet below adds support for preloading, which will provide a small performance boost on modern browsers.
<!-- Google Analytics -->
<script>
window.ga=window.ga||function(){(ga.q=ga.q||[]).push(arguments)};ga.l=+new Date;
ga('create', 'UA-XXXXX-Y', 'auto');
ga('send', 'pageview');
</script>
<script async src='https://www.google-analytics.com/analytics.js'></script>
<!-- End Google Analytics -->
Enable gzip compression
Gzip compression is a lossless method of compression that shrinks files and helps them load quicker due to their smaller size.
Text, HTML, JavaScript and CSS can all be compressed using gzip compression.
You can use various WordPress plugins to apply gzip compression. Services like CloudFlare can also do it for you. Where possible, I like to apply compression directly on the server.
If your hosting package gives you cPanel access, you can add gzip compression directly to your server. Navigate to the “Optimize Website” icon from the cPanel homepage.Select “Compress All Content” and click “Update Settings”.

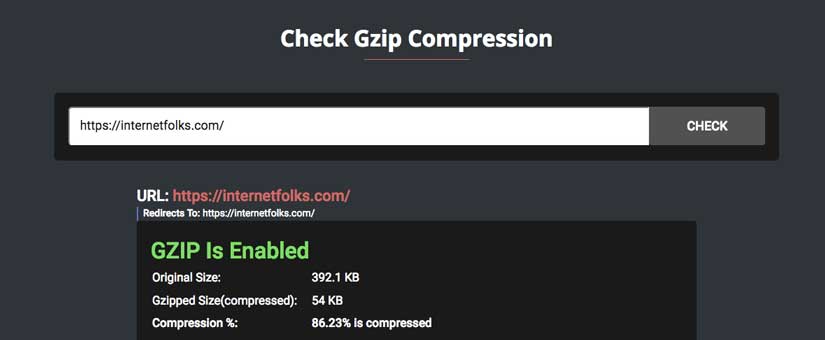
To check if gzip compression is active on your website, run a simple test.
Remove query strings
Some CSS files have a version number at the end, like “css/screen.min.css?ver=1.7”. The bit after the “?” means that the file will not get cached so it will load on every page. This will mean loading times remain slowed down, even if a user visits multiple pages on your website.
Adding this code to the end of the functions.php file of your WordPress theme will remove the query string. You can do this via the File Manager in cPanel, or through an FTP client like FileZilla.
/**Remove query strings

function rb_remove_script_version( $src ){
$parts = explode( '?', $src );
return $parts[0];
}
add_filter( 'script_loader_src', 'rb_remove_script_version', 15, 1 );
add_filter( 'style_loader_src', 'rb_remove_script_version', 15, 1 );
Thanks, 99robots, for that bit of code.
Note: Always make a backup before you mess with system files!
Increase WordPress memory
WordPress has a default memory limit of 32MB, which can throttle your site.
Add the following code to your wp-config.php file.
/** Increase WordPress memory

define( ‘WP_MEMORY_LIMIT’, ‘128M’ );
You can use this free plugin to check how much memory your WordPress site is using.
Add DNS Prefetching
DNS is a Domain Name Server. While we know domains (aka websites) by their word names, like Google.com, computers know domains as numbers called IP addresses (e.g. 12.345.678) In order to fetch resources from a domain, a DNS lookup must occur, which translates the word name to an IP address. This takes time.
DNS prefetching attempts to resolve the domain lookup and translate the word name into an IP address before links are clicked or resources are loaded.
Adding DNS prefetching for common scripts on your WordPress site, like Google Analytics or fonts, will shave a few milliseconds off your load times.
Run a test on WebPageTest and see which external resources you need to prefetch.
Add this code to the functions.php file in your WordPress theme
//* Adding DNS Prefetching

function dns_prefetching() {echo ' ';}add_action('wp_head', 'dns_prefetching', 0);
Go to the “Domains” tab on WebPageTest to find out which external domains to prefetch.
Leverage Browser Caching
Every time a browser (e.g. Chrome, Firefox etc) loads a web page, it has to download every file (like HTML, CSS, JavaScript, images etc) on the page. Without browser caching, if a person revisits the same web page in an hour, it will download all page assets all over again.
Browser caching stores website assets in the user’s browser for a set time period, which should make pages load quicker for them as they continue to browse.
Add the below code to your .htaccess file to leverage browser caching.
## Begin LEVERAGE BROWSER CACHING ##

ExpiresActive On
ExpiresByType image/jpg "access 1 year"
ExpiresByType image/jpeg "access 1 year"
ExpiresByType image/gif "access 1 year"
ExpiresByType image/png "access 1 year"
ExpiresByType text/css "access 1 month"
ExpiresByType text/html "access 1 month"
ExpiresByType application/pdf "access 1 month"
ExpiresByType text/x-javascript "access 1 month"
ExpiresByType application/x-shockwave-flash "access 1 month"
ExpiresByType image/x-icon "access 1 year"
ExpiresDefault "access 1 month"

End LEVERAGE BROWSER CACHING ##
Use caching and CDNs for faster loading
Caching is a fast data storage method that stores HTML versions of your website pages in a server’s RAM so it can be quickly served to visitors.
Without caching, each time a visitor accesses a page on your website, the server must create a new HTML version, which takes time.
The good news is that there are many free WordPress caching plugins to help you out.
I’m using WP Super Cache, because it was created by Automattic, the company behind WordPress.
A CDN (content delivery network) is a network of servers in different global locations that store versions of your website. When a visitor accesses a page on your website, they get it from the nearest CDN location, which will likely be closer than your physical server location. CDNs also lessen the load on your server by storing versions of your website images and large files for quick retrieval.
Without a CDN, your server is only based in a single location and data must be loaded and transfer from that server to the visitor each time.
There are many CDNs out there, like KeyCDN, StackPath (formerly MaxCDN), and Cloudflare. I recommend using Cloudflare if you’re new to CDNs as it is free and easy to setup.
Fix broken requests
The Waterfall view on WebPageTest will highlight (in yellow) any request errors or redirects. These are given using standard http status codes (like 301, 404 etc) and will help you spot problems.
Look for 404 errors first. My site was trying to load a missing image asset as part of the theme. I deleted it and shaved a few milliseconds off my load time. Easy.
Disable WordPress features you don’t use
WordPress is a very powerful and versatile CMS, used on a many different types of website. It’s likely that your own website is not making use of some of WordPress’ features, but it’s still loading them all.
Here are some commonly underused WordPress features you can consider turning off:
- Emojis
- REST API
- RSD Link
- Dashicons
- jQuery Migrate
- Shortlink
- XML-RPC
- Heartbeat API
You can use Clearfy (free plugin) to easily remove unnecessary WordPress bloat from your site.
Load scripts/plugins only on specific pages
WordPress will try to load all the plugins and scripts you have on every single page of your website. But you’re probably not using them all on every page. A common example of this is contact form plugins – if you use a contact form, it’s probably only on your contact page, but the plugin script will be loaded on every page, wasting resources.
And of course, ironically enough, there’s a plugin to help you with your plugin overload issue!
Optimize MySQL database
Whether you’re using MySQL or MariaDB as your WordPress database, you need to keep it optimized to maintain fast website loading speeds. Every time you take an action on your WordPress site, a database record is stored. It can get large!
Optimize your WordPress database to remove bloat like:
- old post revisions
- deleted plugin tables
- trashed posts, pages and comments
If you use a WordPress management dashboard like ManageWP (free), you can optimize your WordPress database in a single click. You can also use a free database optimization plugin like WP DB Manager or cleanup via phpMyAdmin in cPanel or from your website host.
How to tell if your WordPress theme is slow
Not all WordPress themes are created equal.
Depending on how well they are coded and optimized for speed, your WordPress theme might be pretty fast or dragging you down. If you want to know more, read our full test of the fastest WordPress themes.
You can tell by looking at WebPageTest speed audit results.
Look at the Waterfall view and click on any results before the solid blue Document Complete line that seem to be lagging (the slower items will have longer bars). Examine the URLs – anything starting with /wp-content/themes/theme-name-here is a theme file.
I found one annoying theme file that was causing over 1 second of delay. It’s a missing background texture .png image from the Eleven40 theme. To be fair to Genesis, I got the theme years ago and have been modifying it ever since, so I think the poor coding is mine, not down to the child theme. Either way, it’s slowing me down. I could look at my code’s theme and make some tweaks, or I could try switching to a new theme (see theme speed comparison below). To fix the problem, I looked at the theme’s style.css stylesheet and found the problem .png file and changed the code so it would pick up the color white from a CSS command instead.
This simple CSS fix made WordPress load even quicker, and I got a load time of under 1 second!
In the end, I switched to the GeneratePress theme, which is the fastest theme I could find (see below for why!).
Speed Testing Popular WordPress Themes
In the spirit of experimentation, I tested 10 popular themes to see if I could get any speed improvements. You can read the full results here.
| Theme | PageSpeed Mobile | Load Time | PageSpeed Desktop | Theme File Size | Price | Current Users |
|---|---|---|---|---|---|---|
| GeneratePress (premium) | 61/100 | 1.576 seconds | 97/100 | 882KB (+809KB plugin) | $59 | 89,046 |
| GeneratePress (free) | 63/100 | 2.143 seconds | 97/100 | 882KB | $0 | 375,504 |
| Astra | 63/100 | 2.148 seconds | 98/100 | 925KB | $0 | 359,575 |
| Twenty Twenty | 68/100 | 2.218 seconds | 98/100 | 698KB | $0 | 19,973 |
| Genesis | 53/100 | 2.305 seconds | 95/100 | 329KB | $59.95 | 303,811 |
| X Theme | 49/100 | 2.4 seconds | 89/100 | 5.6MB | $59 | 200,000+ |
| OceanWP | 49/100 | 2.582 seconds | 89/100 | 3.2MB | $0 | 322,365 |
| Divi | 46/100 | 2.648 seconds | 90/100 | 6.6MB | $89 | 1,362,180 |
| Enfold | 43/100 | 2.810 seconds | 84/100 | 19.2MB | $59 | 359,345 |
| Avada | 34/100 | 2.854 seconds | 83/100 | 5.4MB | $60 | 623,527 |
TL;DR: GeneratePress Premium is the fastest WordPress theme you can buy right now. And I’ve since moved this website over to GeneratePress.
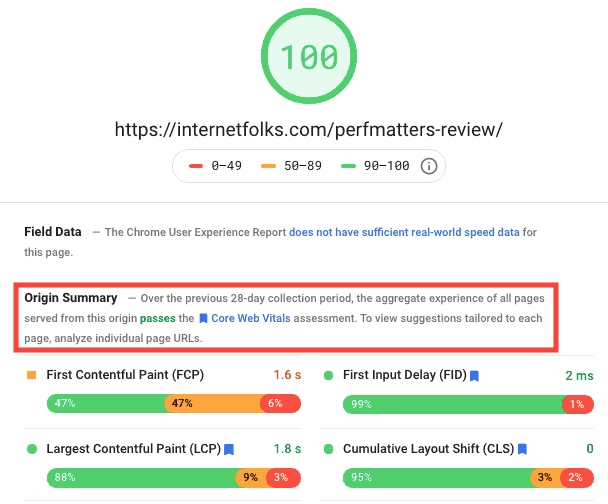
Here’s an updated speed test so you can see just how fast it is. The results is for my perfmatters review page:

That’s a total load time of under 1 second, and a mobile speed score of 91/100 on PageSpeed Insights.
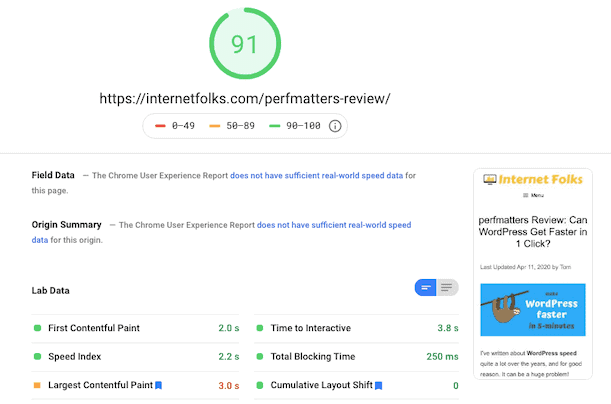
The page also passes Google’s Core Web Vitals test on desktop:
How to spot slow hosting issues
Not all of WordPress’ site speed issues can be magically improved by switching hosts or upgrading to a faster hosting package, but you can use WebPageTest to identify exactly how much your hosting is slowing you down.
Try hosting a simple index.html file and checking loading times. If you can’t get a fast TTFB on a simple html page, your hosting is slowing you waaaaay down.
I uploaded a simple HTML page, with images, and got a TTFB of 0.221 seconds, which is good for cheap hosting! So my hosting provider is not slow, but my WordPress site sure is! Now I know that there’s not much point in spending more money on hosting until I’ve optimized WordPress.
I’ve since moved my WordPress website to Cloudways, which costs me $10/month but offers fantastic speeds. I now get a TTFB of 0.092 seconds, which is very fast. You can read my Cloudways review for more info.
WordPress Speed Plugins
After I spent ages researching WordPress speed improvements and testing methods with my websites, I found that the perfmatters plugin (review here) does a lot of the work for you. For less than $25, it’s a no-brainer quick-fix.
There’s also WP Rocket (review here), which will do a great job of speeding up your WordPress site.
Also, if you’re not interested in tweaking server and cPanel settings yourself, you can also use managed WordPress hosting like Kinsta and outsource the work to them. It’ll cost you a lot more than cheap hosting, but at least you can forget about it and leave it to the experts.
Personally, I like to do the work myself, and I think it’s important to have an understanding of what it is that slows down a WordPress site. That said, I do recommend using third party services to clients, less tech-savvy WordPress users or those who value their time.
If you want a quick fix to a slow WordPress website, I recommend using the following plugins and services:
I’ve also heard good things about Nitropack, but I haven’t tested it out yet.

