Migrating an existing WordPress website to Cloudways is ridiculously easy.
In fact, you don’t need to do anything, because you get a free managed migration when you sign up. If, like me, you prefer a DIY approach to WordPress migration, here’s how to move your WordPress hosting to Cloudways in 6 easy steps.
Table of Contents
Step 1: Sign up for Cloudways
Get the Cloudways free trial (no credit card required) so you can test how your WordPress site performs on Cloudways before making a commitment. Don’t forget to use a coupon code now for extra savings if you decide to stay (CLOUD20 will give you 20% off for 3 months).
Step 2: Launch a new server with a blank WordPress install
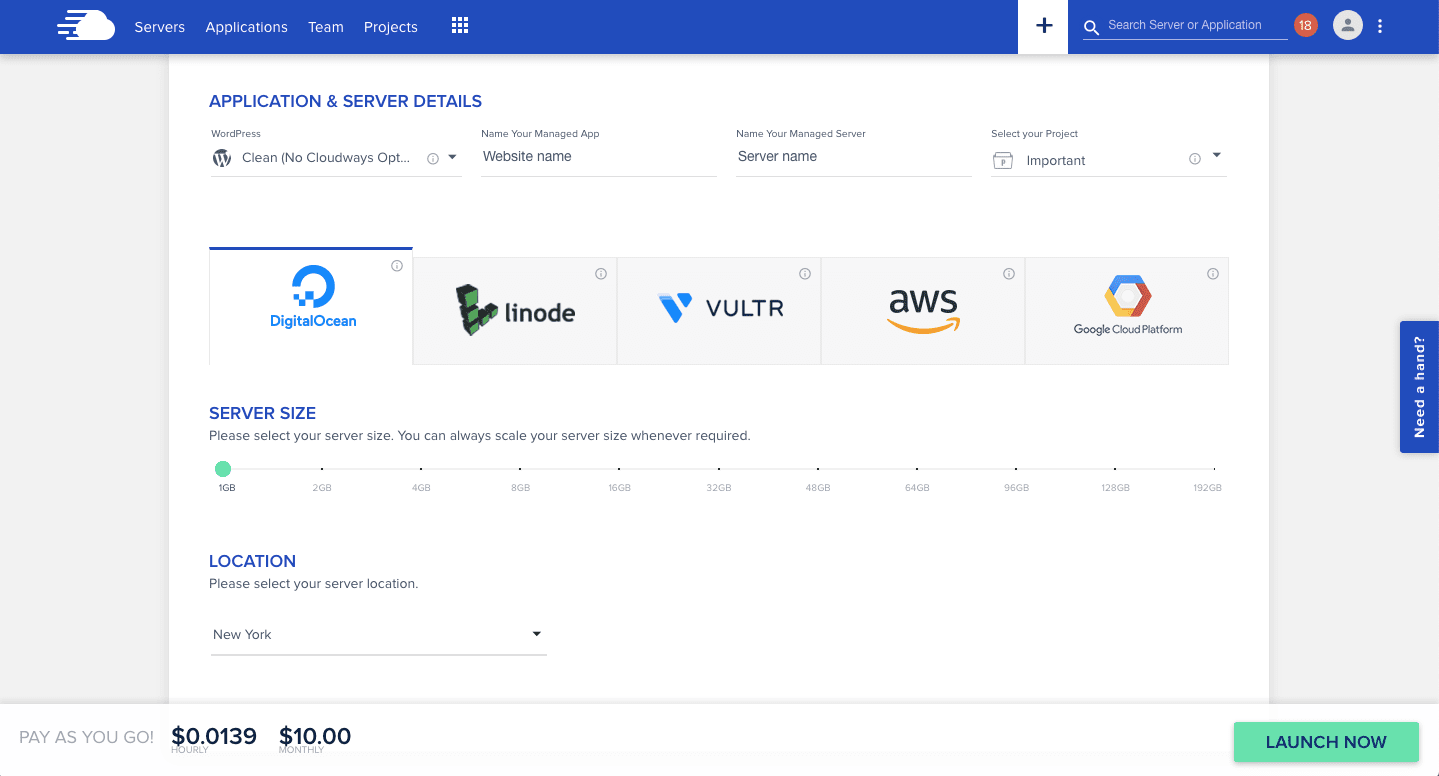
The $10/month 1GB RAM DigitalOcean server will be more than enough for a small WordPress site. You can always upgrade later.
Select the “Clean (No Cloudways Optimization)” WordPress installation. Once you migrate your existing WordPress site it will replace this installation.
Step 3: Install the Cloudways Migrator Plugin
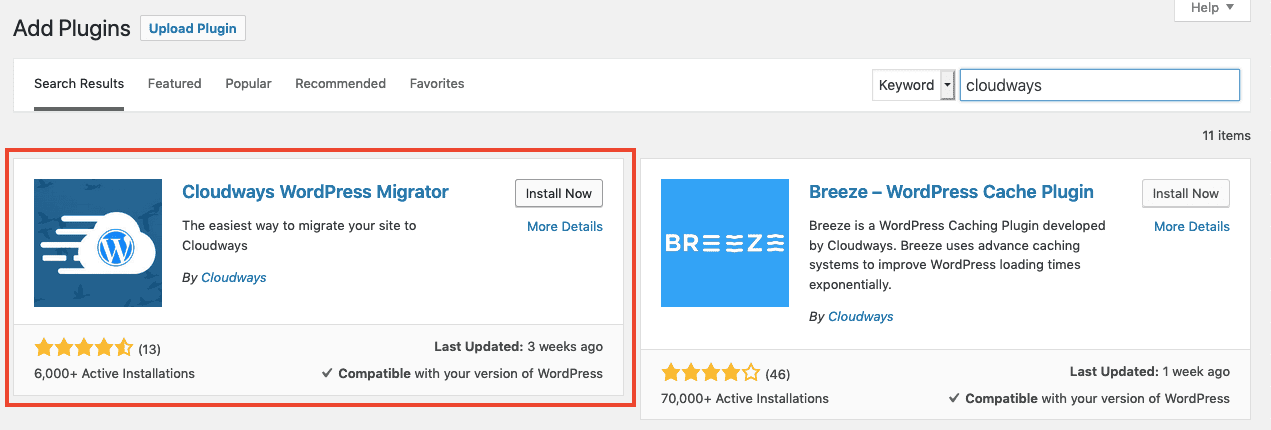
Log into the WordPress website you want to migrate. In the WordPress dashboard, go to Plugins > Add New and search for Cloudways. Click “Install Now” to install the Cloudways WordPress Migrator plugin, then “Activate” to get started.
Step 4: Copy your Cloudways server details into the plugin settings
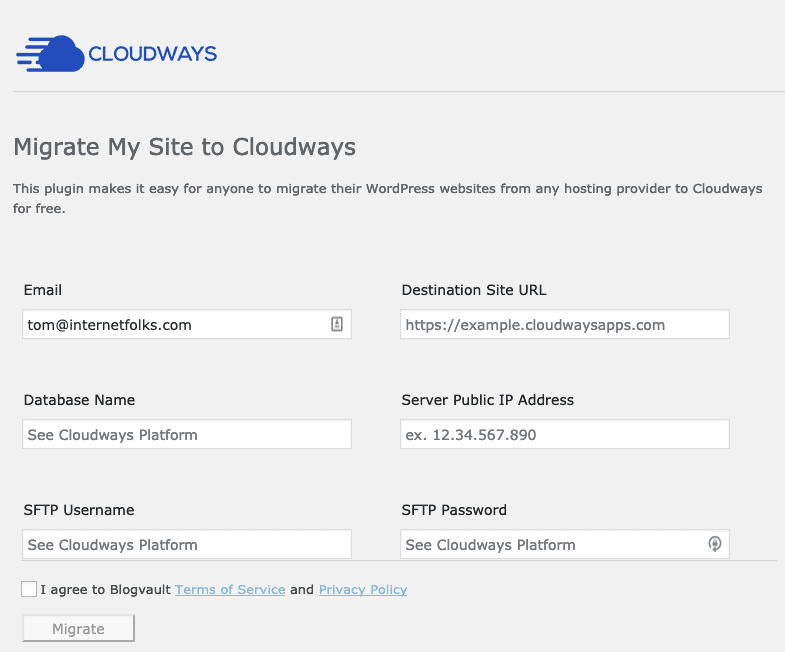
Go to the Cloudways WordPress Migrator plugin settings – you’ll see 6 fields that need filling out. Start with your email address (this is just to get an email to confirm that the migration has completed successfully, it does not need to be the same as your WordPress account email).
In the Cloudways dashboard, go to “Applications” then click on your new blank WordPress installation. Under “Application Details”, you’ll see the main Access Details settings.
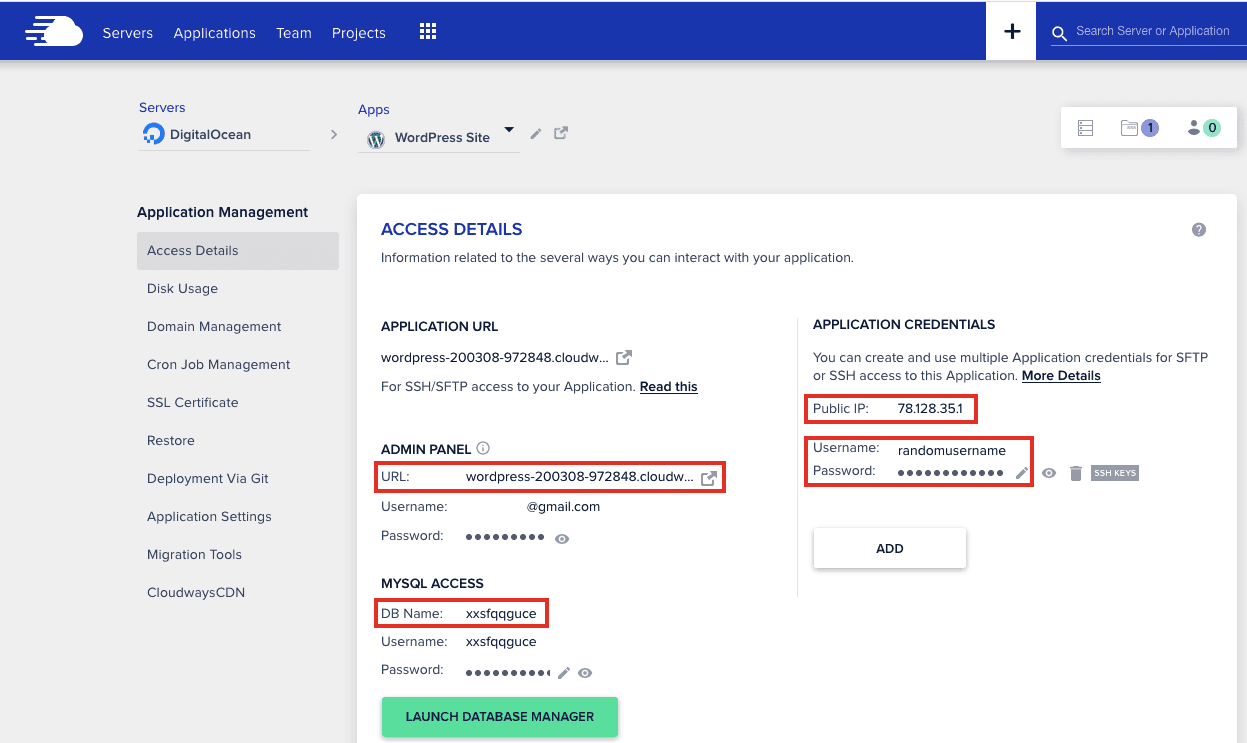
From there, you’ll see the fields to copy/paste into the plugin settings window.
- Destination Site URL – that’s the URL that will look something like wordpress-2390484757.cloudways.com (don’t use your WordPress site domain main yet, you’ll add that later once you’ve checked the migration works)
- Database Name – under MYSQL Access > DB Name
- Server Public IP Address – under Public IP
- SFTP Username and Password – under Application Credentials, first create a strong username and password, then copy/paste
Finally, read and agree to the terms, then hit “Migrate” to start the process. Remember, your WordPress site will now be cloned over to the Cloudways server – your existing site on its current hosting will not be affected.
You can visit the temporary Cloudways domain (e.g. wordpress-2390484757.cloudways.com) to check everything migrated ok, and even log in to see the admin side of things.
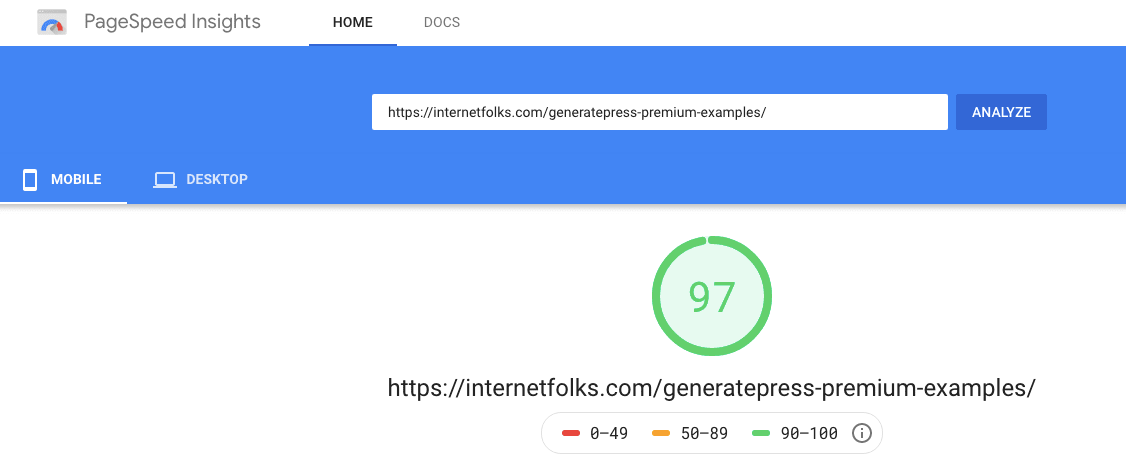
Tip: Run a speed test (like Google’s PageSpeed Insights) to see how much faster Cloudways is than your existing host. Test the same page on your old host and the new Cloudways-hosted clone. You’ll probably be shocked by how much faster it is on Cloudways.
Once you’re sure everything works as it should, you can move onto the final step – making the official move over to Cloudways.
Step 5: Add your domain name and SSL certificate
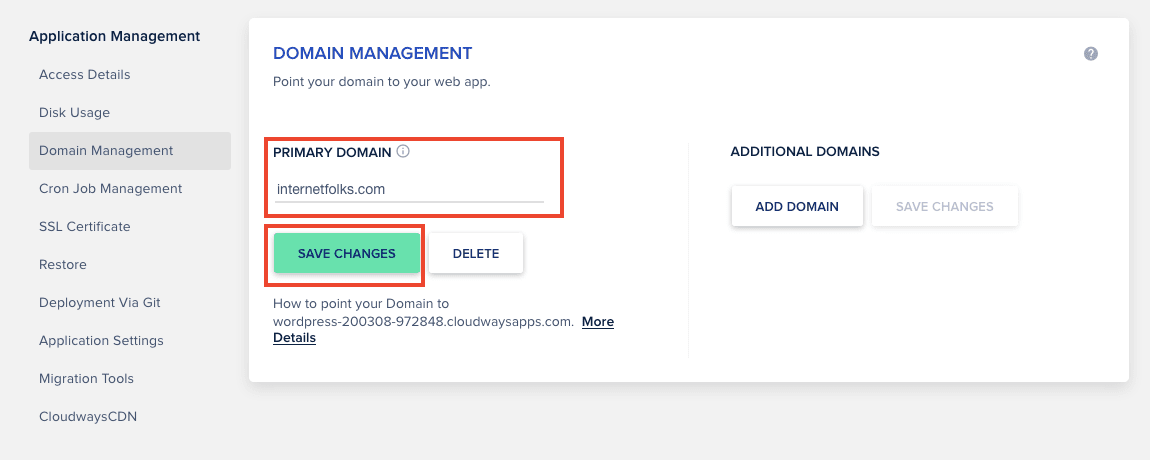
In Application Management > Domain Management add your domain name in the field named “Primary Domain” and click “Save Changes”.
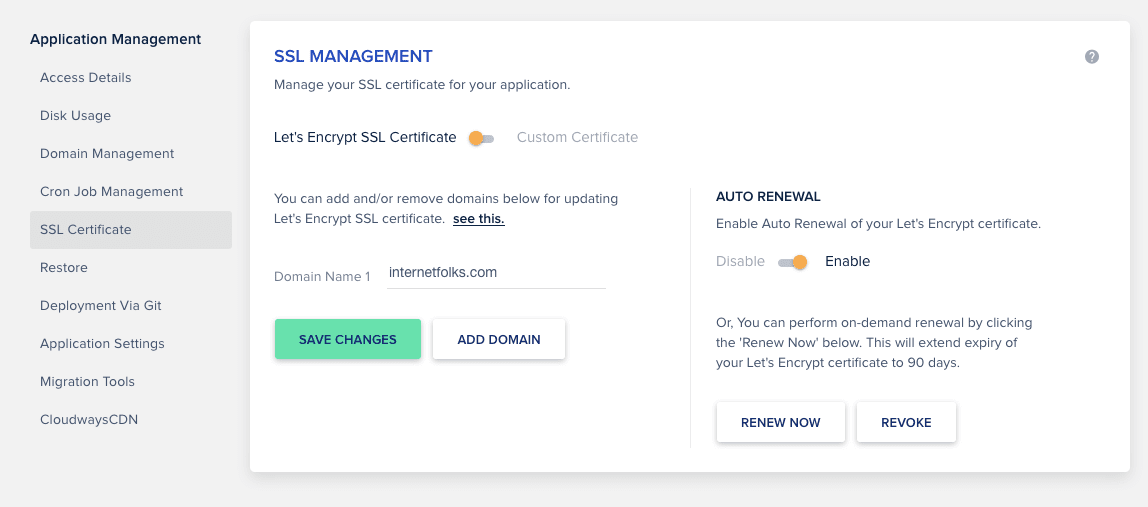
To add a free Let’s Encrypt SSL certificate, simply go to Application Management > SSL Certificate and add your domain name. I also recommend enabling the auto renewal feature to ensure your SSL certificate does not expire.
Step 6: Setup DNS
There are multiple DNS setup methods you can use (including adding an A record directly at your registrar, e.g. Namesilo) , but I recommend using Cloudflare alongside Cloudways to manage your DNS settings and CDN – it’s free and helps keep your WordPress site secure and fast.
Note: Cloudflare will take care of your SSL certificate so you don’t need to use Let’s Encrypt (shown above).
Create a free Cloudflare account if you don’t already have one. You’ll need to change your nameservers to something like tom.cloudflare.com at your domain registrar. Don’t worry, you can do this without affecting your existing hosting setup, as Cloudflare will import your current details.
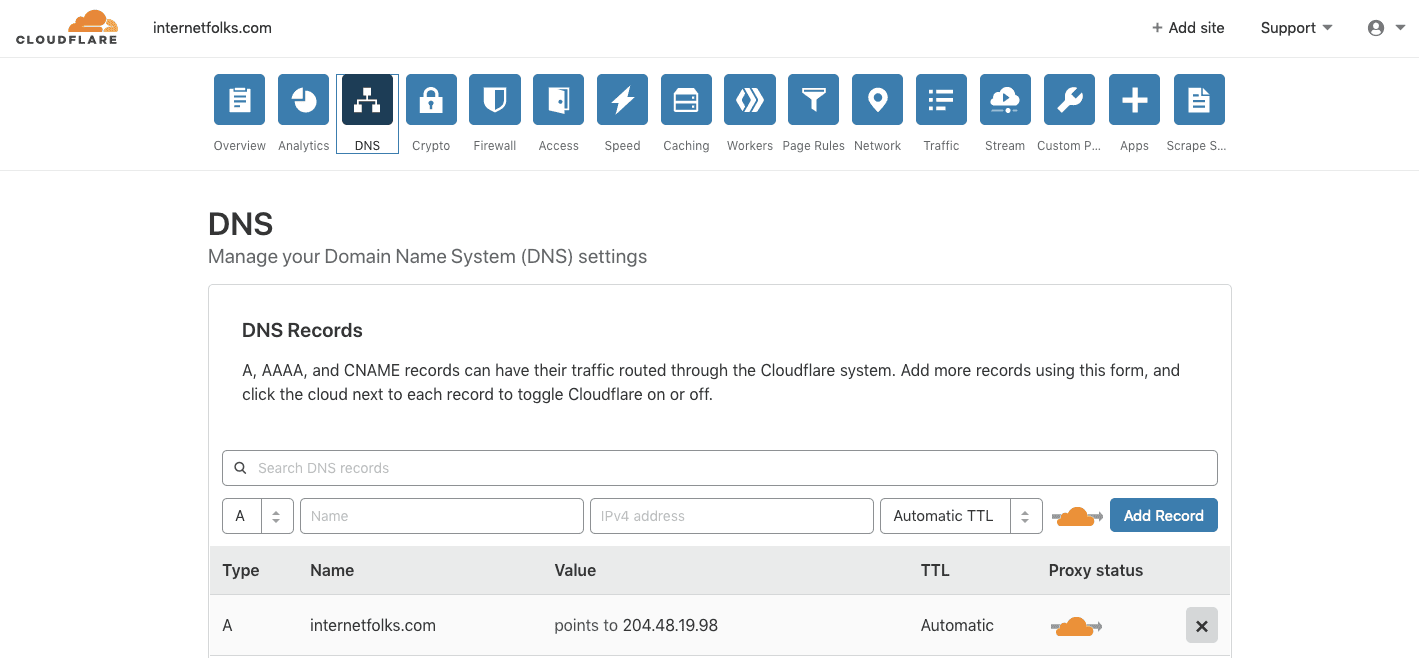
To switch to Cloudways, create/edit an A record with the name of your domain, and enter the Public IP address from the Cloudways application settings, under Access Details > Application Credentials > Public IP.
Final thoughts
And that’s it – your WordPress website is now hosted by Cloudways! You can easily switch between your old and new host by changing the A record IP address in Cloudflare. Don’t forget to cancel your old hosting account once you’re ready to make the permanent move.
Whichever cloud hosting option you go for, I recommend you switch away from shared hosting. Cloud hosting is not expensive (DigitalOcean starts at $5/month, Cloudways $10/month), but it’s worth using for its faster speeds alone. And it’s a whole lot more affordable than premium WordPress hosts like WPEngine and Kinsta.
For a longer rundown of what Cloudways hosting offers WordPress site owners, read my in-depth Cloudways review. If you want to see how Cloudways compares to other cloud hosting options, check out my comparisons of Cloudways vs ServerPilot and Cloudways vs RunCloud.
Here’s how to migrate your WordPress website to RunCloud (and DigitalOcean), so you can see how it differs from Cloudways (it’s a very similar process, but RunCloud doesn’t offer a WordPress migration plugin like Cloudways does).

