In another of my WordPress cloud hosting tutorials, I’m going to show you the step-by-step way to move your WordPress website to cloud server provider UpCloud using RunCloud as the cloud server control panel.
Table of Contents
Why UpCloud?
Quite simply, UpCloud offers excellent hosting speeds at a low price of $5/month. According to VPS Benchmarks, UpCloud’s $5/month cloud server package is better than DigitalOcean’s.
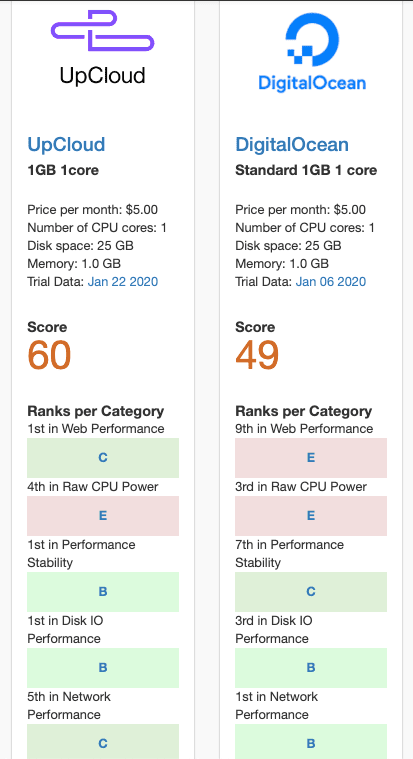
As someone who’s constantly working on making WordPress faster and cheaper to host, UpCloud really stood out to me as a fantastic hosting opportunity.
Why RunCloud?
RunCloud is a cloud hosting control panel. It makes it simple to manage any cloud server, including one from UpCloud, without needing to do any Linux command line server management.
You can read my comparison of RunCloud and Cloudways for more information.
RunCloud connects to UpCloud via API, so you can create and delete servers directly from the RunCloud dashboard.
Let’s get straight into the tutorial.
How to move your WordPress site to UpCloud using RunCloud
Step 1: Sign up for UpCloud
If you sign up for UpCloud by using my referral link (thanks!) you will get $25 free credit and a 3-day free trial.
You will need to add your credit card details to sign up, and they make a $1 charge and refund to verify the card. If you choose to stay beyond the 3-day trial, you’ll need to make a $10 deposit, which will be added to your $25 free credit. Tax will be added to deposit amounts, so in Europe, for example, you’ll pay 20% extra (e.g. $12 for a $10 deposit).
Step 2: Sign up for RunCloud
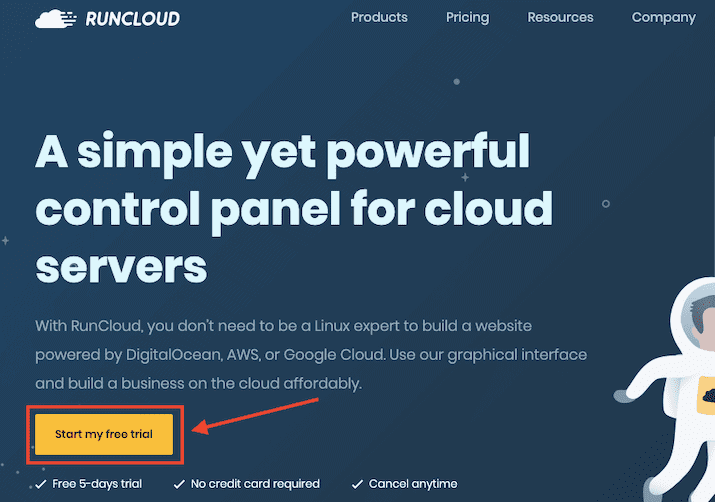
The first step is to sign up for RunCloud. You will get a 5-day free trial (no credit card required), but you can remain on the free plan indefinitely (they don’t make that clear when signing up!).
Create a username and password. Confirm your account by clicking the link in the email RunCloud will send you.
Step 3: Create an UpCloud API account
While logged into your UpCloud account, go to this URL:
https://hub.upcloud.com/people
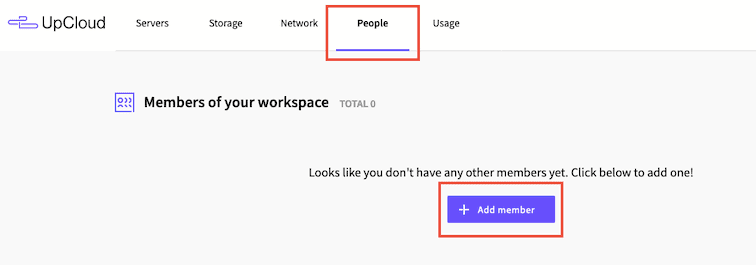
Or from the main UpCloud dashboard, select the “People” menu and click the “Add member” button.
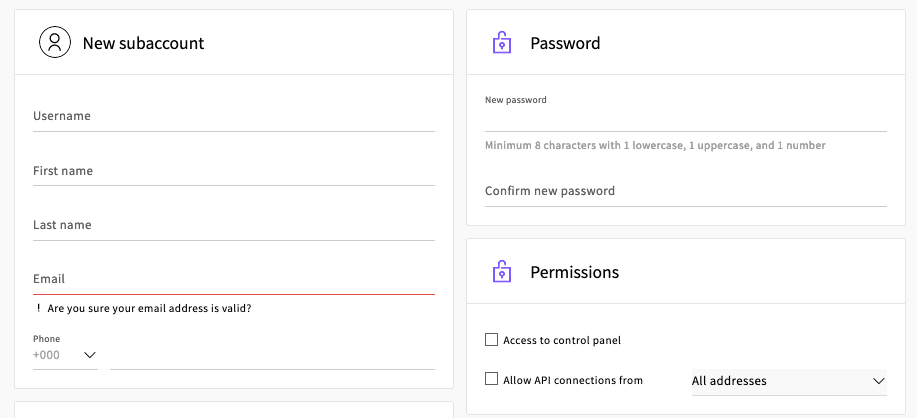
We’re going to create a subaccount with API access. Add a unique username and password and fill in your name and phone number details. Make sure you use a very complex password as this will become your API secret key in the next step.
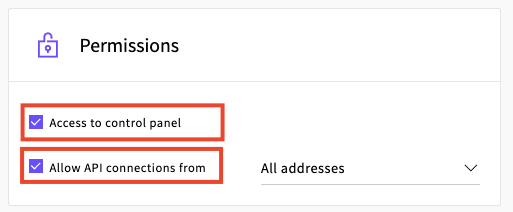
In the “Permissions” section, check the boxes to give the account access to the control panel and allow API connections from all addresses.
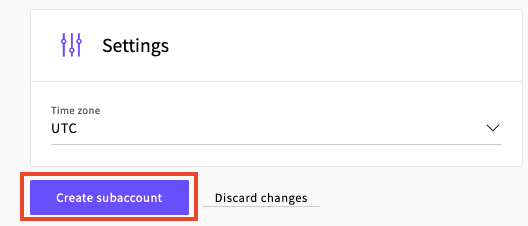
Leave the other settings as they are, and click the “Create subaccount” button to finish.
Step 4: Add a new UpCloud server from RunCloud
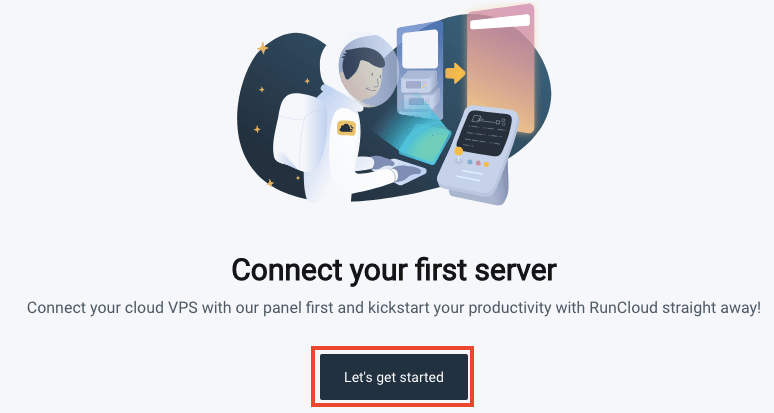
From your RunCloud dashboard, click “Let’s get started” to setup your first server.
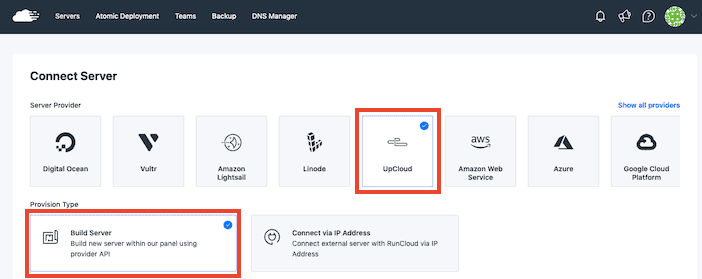
Under “Server Provider”, select “UpCloud”, then “Build Server”.
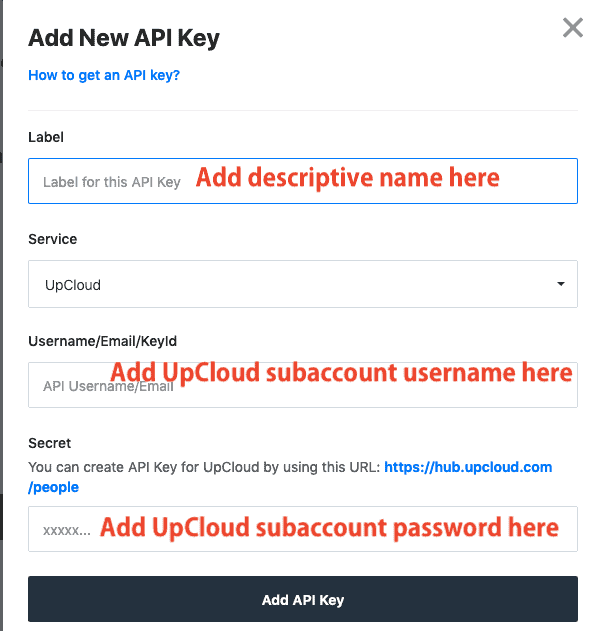
Scroll down the page you will see a section called “Keys”. Click “Add new key” and add your UpCloud subaccount credentials. Hit the “Add API Key” button to save.

Select your new key in the drop-down menu and click “Build Server” to move on.
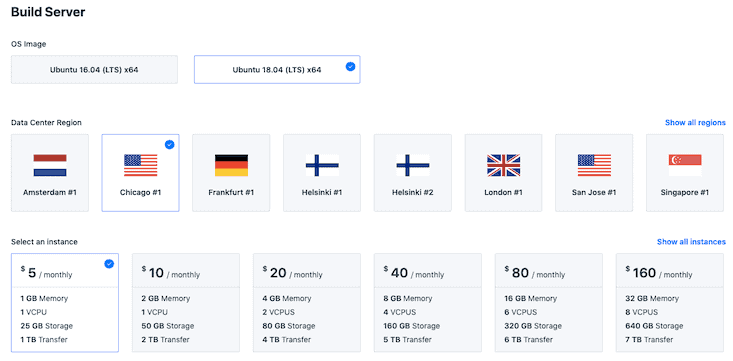
Select your server requirements. As the OS Image, I prefer Ubuntu 20.04 as it’s the latest version. In Data Center Region, pick the location for your new server. Go with the closest location to your website visitors (check Google Analytics if you’re not sure).
I’m using the $5/month server for this tutorial, which provides 1GB memory, 1 CPU, 25GB of storage space and 1TB of data transfer (bandwidth). This is more than enough for most small to medium WordPress websites or even multiple WordPress sites.
You will be able to monitor server usage via RunCloud and UpCloud so you’ll know if you ever need to upgrade to a larger server.

Give your server a descriptive name, check the box to acknowledge that you will be billed for this server in UpCloud, then click the “Add this server” button.
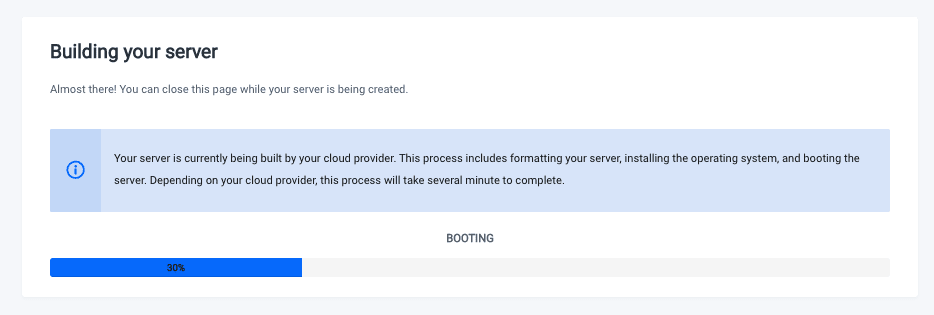
RunCloud will now build the UpCloud server for you, which should take a couple of minutes.

You’ll then need to wait around 15 minutes while RunCloud configures your server.
If you log in to UpCloud, you’ll see that a new server has been created for you:
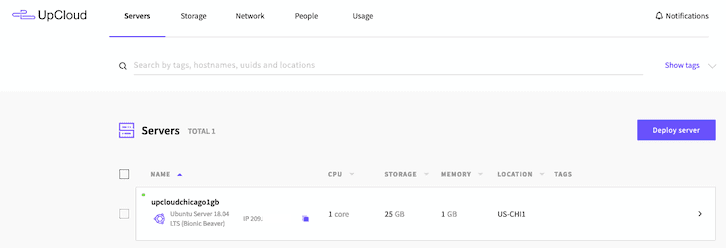
You can view server statistics and set up backups directly in UpCloud if required, or use RunCloud to manage everything instead.
Step 5: Install WordPress on your new UpCloud server

In the left-hand menu bar, click “Web Application”, then hit the “Create Web App” button.

Select the “1 Click WordPress” option.
Now there are some settings to configure.
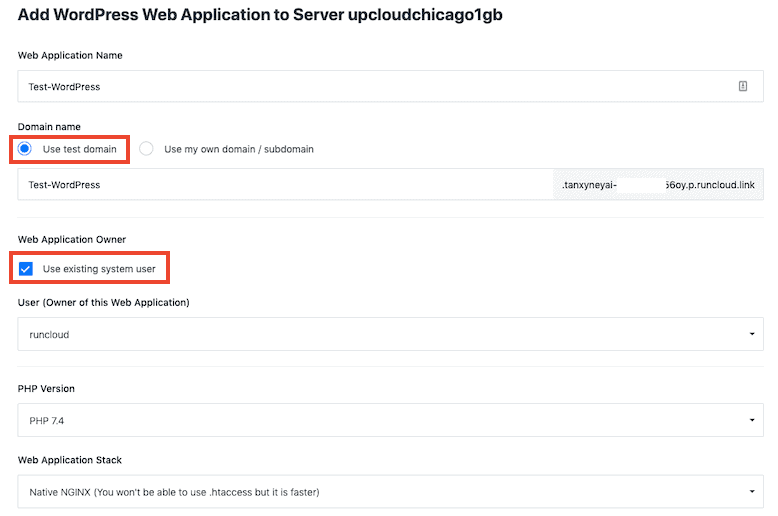
Give your application a descriptive name.
In the Domain name field, select “Use test domain“. This will let you view, configure and test a live version of your WordPress website on a temporary domain (e.g. 12345test.runcloud.link). When you’re ready to switch your domain name, you can make the move with no downtime.
If you prefer to use your own domain, I recommend using a subdomain, like new.mywebsite.com, you can test everything out before making the switch with no downtime. You will need to map the subdomain to the new WordPress app by adding a DNS record to do this (see Step 8).
You can also access the website by IP address if you set the WordPress web app as the default application and are only putting a single app on the server.
In Web Application Owner, leave “Use existing system owner” checked.
Select the latest PHP version in the drop-down.
For Web Application Stack, you can choose from:
- NGINX + Apache2 Hybrid
- Native NGINX
- Native NGINX + custom config
Native NGINX is the fastest option for WordPress, but you won’t be able to use .htaccess. If you need .htaccess, select NGINX + Apache 2 Hybrid.
Do I need .htaccess for WordPress?
If you’re not sure if your current WordPress website uses .htaccess, look inside your website’s public_html folder (connect via SFTP client like FileZilla or File Manager in cPanel) and look for a .htaccess file. View the file to see what it’s being used for. Some WordPress plugins use .htaccess to make changes.
It is possible to migrate .htaccess to NGINX server block format, but it will involve some coding.
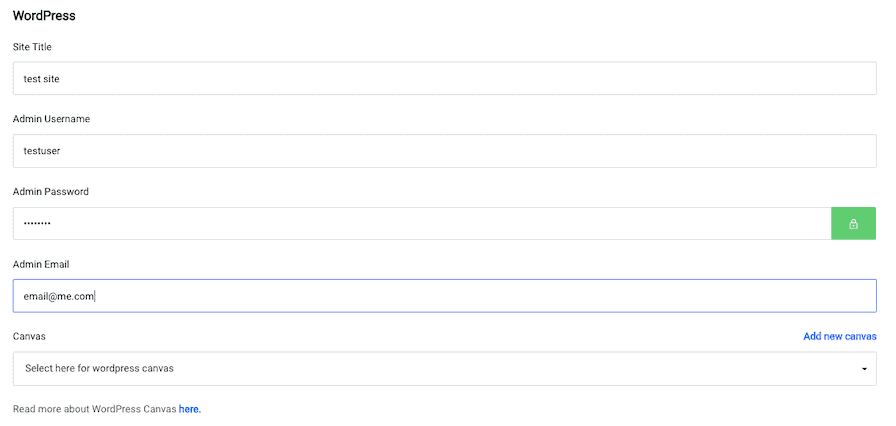
Add your WordPress details:
- Site Title
- Admin Username
- Admin Password
- Admin Email
Don’t worry about using the same details as your existing WordPress site – we’re going to be replacing this new WordPress installation with your old site soon.
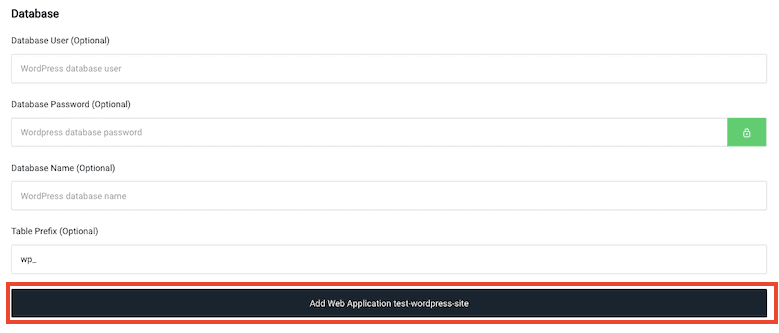
Leave the Database settings blank, then click “Add Web Application”.
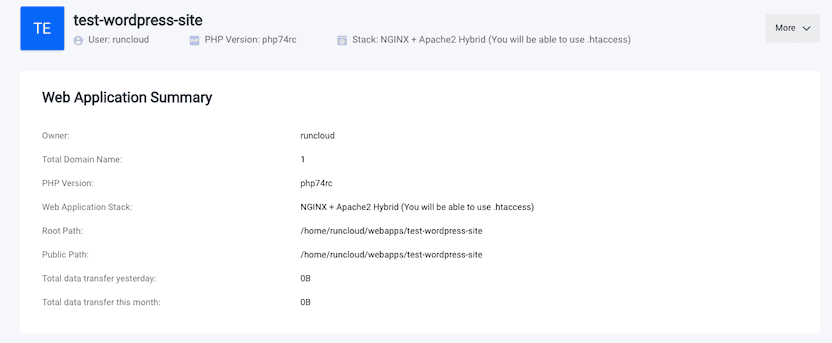
You’ll get a confirmation screen almost instantly:
Step 6: Use Migrate Guru to move WordPress to RunCloud
I’ve already written a tutorial on how to migrate any WordPress website to RunCloud, using the All-in-One WP Migration plugin, which is fine for small and simple sites (see how to migrate your WordPress website with All-in-One WP Migration).
However, I prefer to use Migrate Guru (free WordPress plugin) to move sites, as it is quicker and can handle complex setups. RunCloud’s documentation on using Migrate Guru is a bit vague, so let me fill in the blanks for you.
Create an SFTP user in RunCloud
To use SFTP you will need to be using RunCloud’s 5-day free trial or subscribe to at least the Basic tier ($8/month or $80/year).
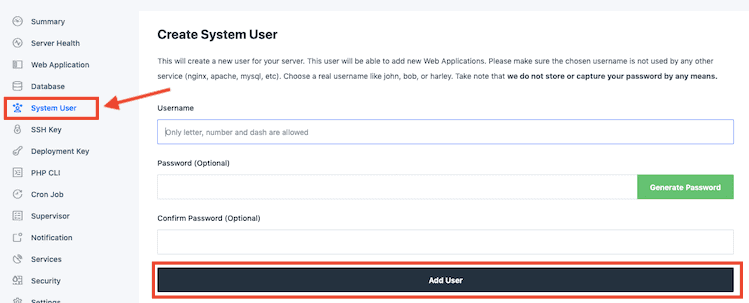
In the RunCloud dashboard, select your UpCloud server, then pick “System User” from the left-hand menu. Choose a unique username and password and click “Add User”.
Keep a copy of the username and password handy as you will need to enter them into Migrate Guru in the next step.
Install Migrate Guru on the WordPress website you want to migrate
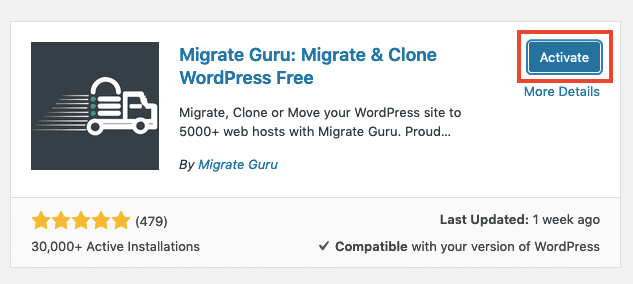
From the main WordPress Dashboard of the site you want to migrate, go to Plugins > Add New and search for “migrate guru”. Click “Install Now”, then “Activate”.
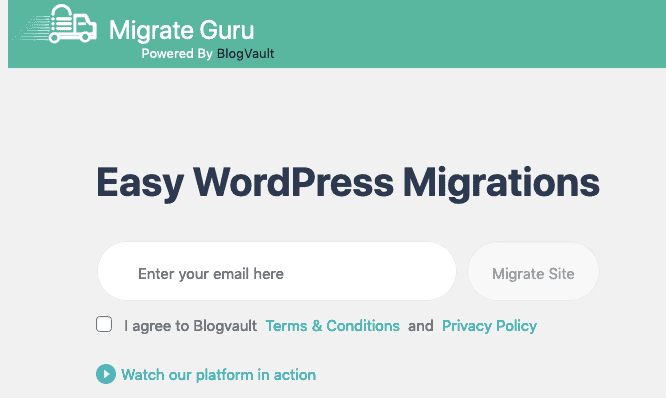
You should automatically be taken to the first step of Migrate Guru. Enter your email, read and accept the terms and click “Migrate Site” to continue.
Note: You don’t need to click anything via email to complete the migration, but Migrate Guru will send you a migration confirmation message via email and then a bunch of marketing emails for their other products (like BlogVault).
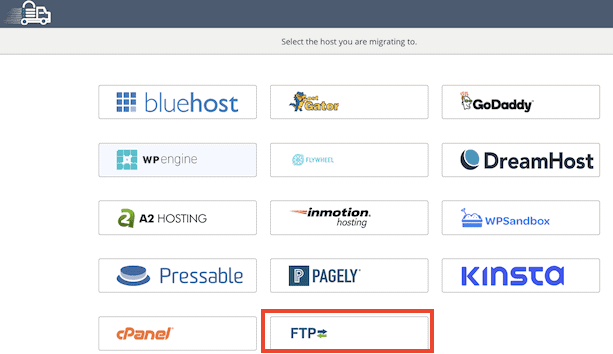
Choose “FTP” from the host selection screen.
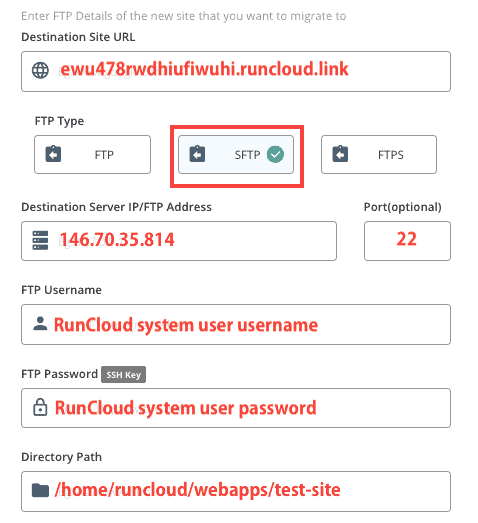
I’ll now go through how to fill in the Migrate Guru FTP details, and show you where to find the right information in RunCloud.

Destination Site URL: Go to the main RunCloud dashboard, then click on your server, then select “Web Application” on the left menu. The domain attached to the WordPress installation will be displayed.
FTP Type: Select SFTP.
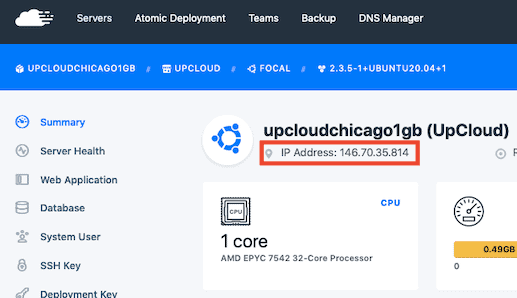
Destination Server IP/FTP Address: This is the IP address of your server. In RunCloud, you’ll find it on the summary page of your server.
Port: Put in 22 as the port number.
FTP Username: Enter the RunCloud SFTP System User username you created in the previous step.
FTP Password: Enter the RunCloud SFTP System User password you created in the previous step.
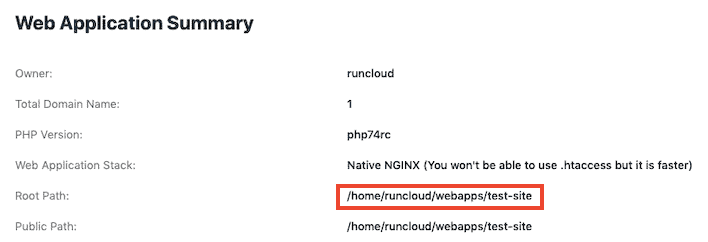
Directory Path: This is location on the server where your WordPress site is. You can find the correct path in RunCloud by going to Server > Your Server Name > Web Application > Your Web Application Name to view your web application summary with the “Root Path”.
Leave all the other settings as they are and click the “Migrate” button to get going.
If you have problems, I suggest using your own subdomain instead of RunCloud’s temporary domain. Setup an A record at your domain registrar or Cloudflare. Using your own domain will also allow you to test HTTPS and Let’s Encrypt.
If you get an error message stating something like “wp config cannot be accessed”, then try using the “runcloud” main System User account. In the RunCloud dashboard, select your UpCloud server, then pick “System User” from the left-hand menu.

Change the password, and paste it into the Migrate Guru form.
Once Migrate Guru has verified your server settings, the migration will begin and you’ll see a progress bar.

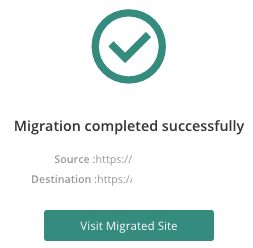
After a couple of minutes, you’ll get a success message.
If your site is not loading correctly, you can create a Let’s Encrypt SSL certificate so you can test it with SSL (paid accounts on free trial only). You’ll find the SSL menu in RunCloud’s left-hand menu when you select your WordPress application.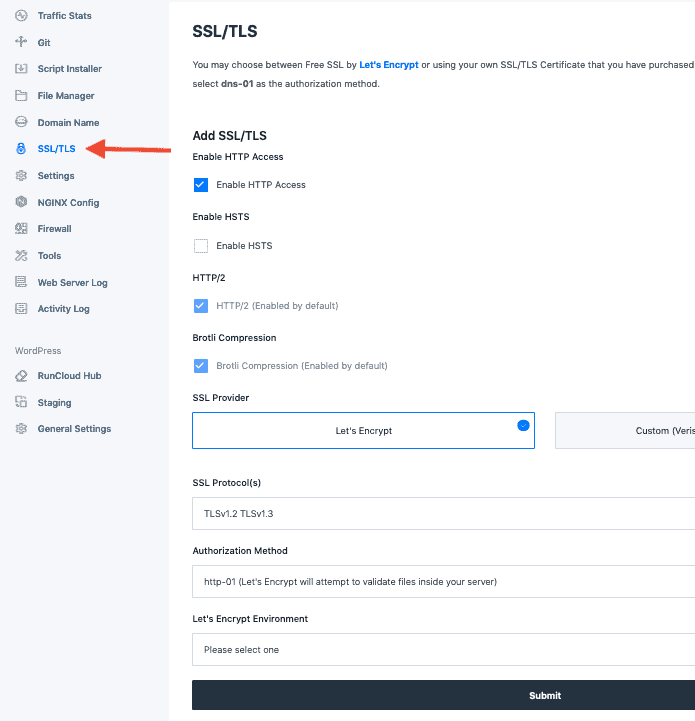
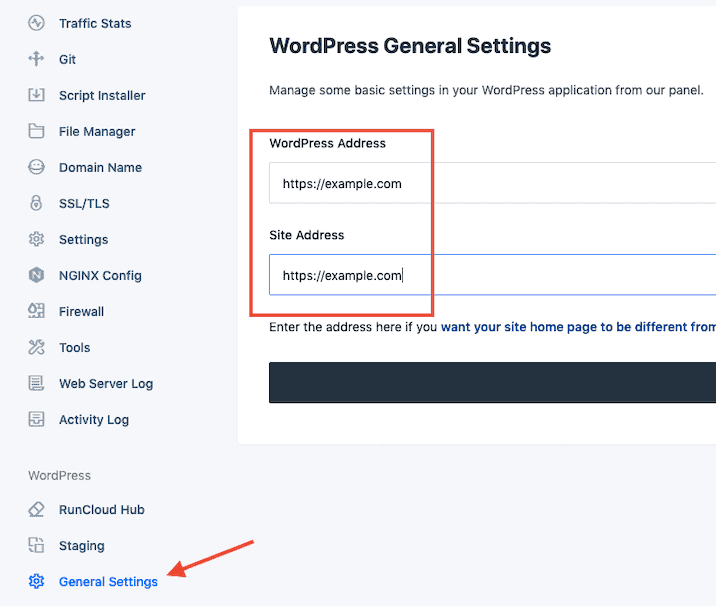
Also make sure that the WordPress site address is correct. In RunCloud, in your application settings, click on “General Settings” in the WordPress section and update your WordPress Address and Site Address as required.
Step 7: Check your site
Your new WordPress site will have the exact same structure and content as the old one.
You’ll have to login to WordPress again, this time using the username/email and password from your old site (the new login details have now been overwritten).
You can go ahead and delete the Migrate Guru plugin as it’s no longer needed. You may also find that the Hello Dolly and Akismet plugins have remained from the fresh WordPress install – if you don’t use them, delete them too.
Now that your new site is a carbon copy of your old one, it’s time to check it through and see if anything is broken.
If your site is small, you can check it manually. If you have a lot of pages, you can make automated checks using software like Screaming Frog or the ahrefs site audit feature. Run a crawl of your existing domain, and the new installation domain and look for differences.
Remember to check the following things are correct on the new site:
- Permalink structure
- Google Analytics code
- Meta titles and descriptions
- Robots.txt
- Plugin licenses
If you’re using a single-site license plugin, you’ll need to switch the license over once the migration is complete.
Another great check to perform at this stage is a WordPress speed test. You can see how much faster your new RunCloud cloud server setup is compared to the old host.
There are many free website speed checkers out there, but I like how quick and easy it is to check site speed across many locations at once with FastorSlow.com.

Compare a page on the new RunCloud hosting setup to the old host and see what speed improvements you can get.
You can also check Google’s PageSpeed Insights tool.
Once you’re satisfied that the new website is error-free, fast and ready to go, it’s time to complete the migration.
Step 8: Change your DNS settings to complete the migration
The only thing left to do is point your domain name (e.g. mywebsite.com) towards your new RunCloud/DigitalOcean server, and away from your old host.
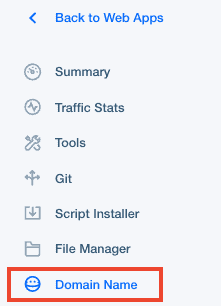
In the RunCloud dashboard, go to your web app, then click on “Domain Name” in the left-hand menu.
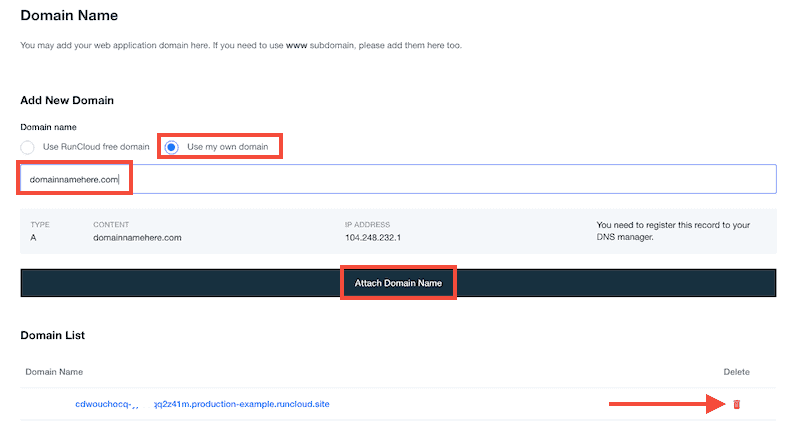
In the “Add New Domain” section, select “Use my own domain” and type/paste your domain name into the blank field, then click “Attach Domain Name”.
Then you can delete the temporary RunCloud domain from your app by clicking the red bin icon.

If you previously added a Let’s Encrypt SSL certificate to a test subdomain (e.g. new.mydomain.com), you will need to redeploy it to avoid redirect loops.
Note: If you are using a non-www domain as your primary domain, make sure you add both the www.domain.com and domain.com to RunCloud, and create an additional CNAME DNS record. This will ensure that your www.domain.com will be correctly redirected and you won’t have any problems with incorrectly indexed pages. 

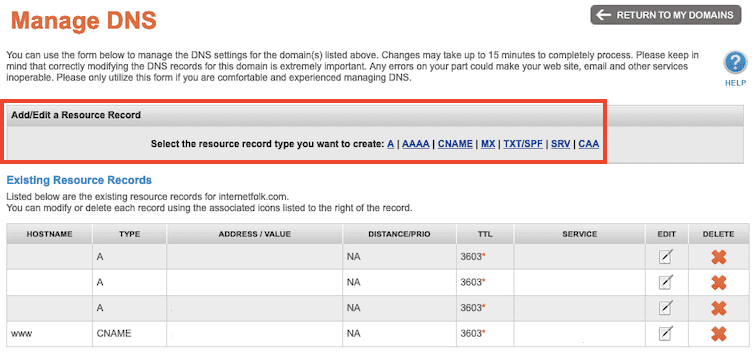
Adding an A Record
You now need to add the A record to your DNS manager. It’s not as tricky as it sounds.
You can add an A record at your domain name registrar (the place you bought the domain name from), or via a third party service like Cloudflare.
For example, here’s how I can add an A record in at my registrar, NameSilo:
If you use Cloudflare’s nameservers to manage DNS records instead, as it also helps keep your website fast and secure. It’s free to use, and once you’re using Cloudflare’s nameservers, you can change out the IP address in the A record to point to your UpCloud server IP address.
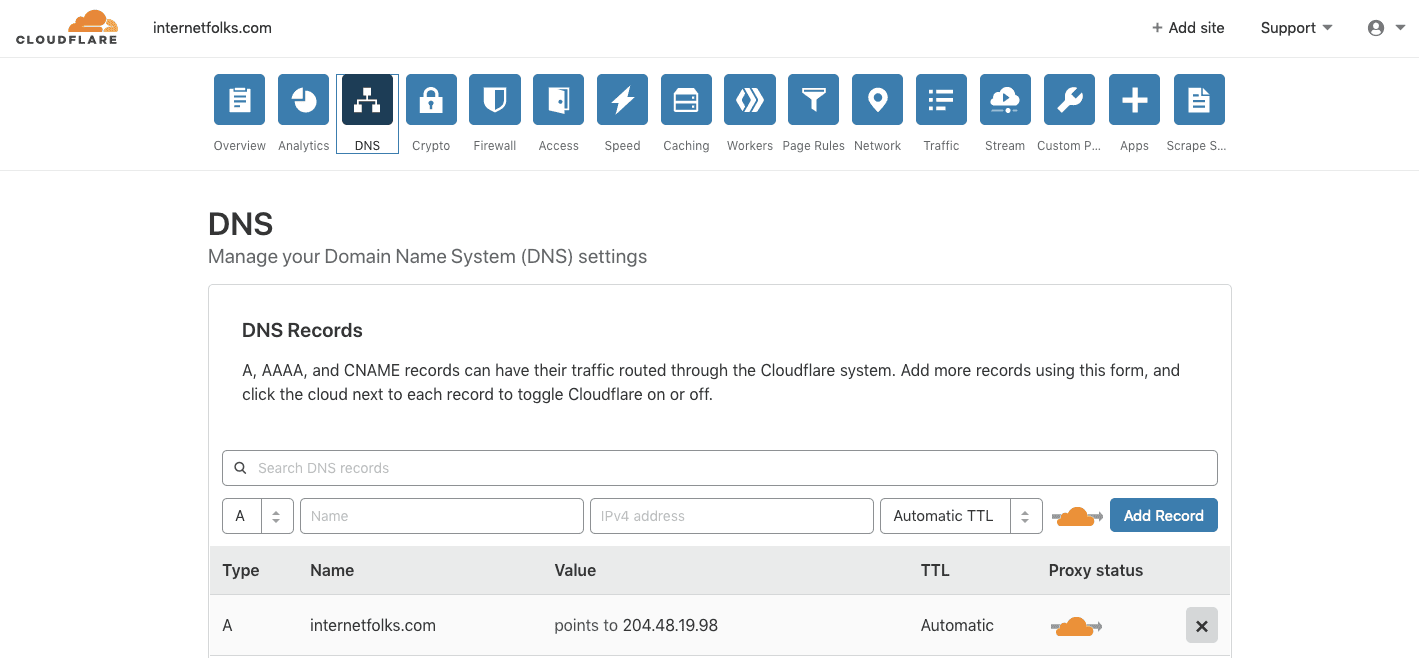
You can also use Cloudflare to manage DNS without acting as a CDN. Click the orange cloud icon under “Proxy status” until it reads “DNS Only”.

And that’s it: once your DNS records propagate (could take a few minutes depending on your registrar), your website is now migrated over to UpCloud and managed through RunCloud.
Tip: If you get an error message along the lines of: “The page isn’t redirecting properly” and you’re using Cloudflare, make sure you’re using “Full SSL” in Cloudflare. If your site is configured ot use “Flexible SSL”, you may have an issue with an infinite redirect loop.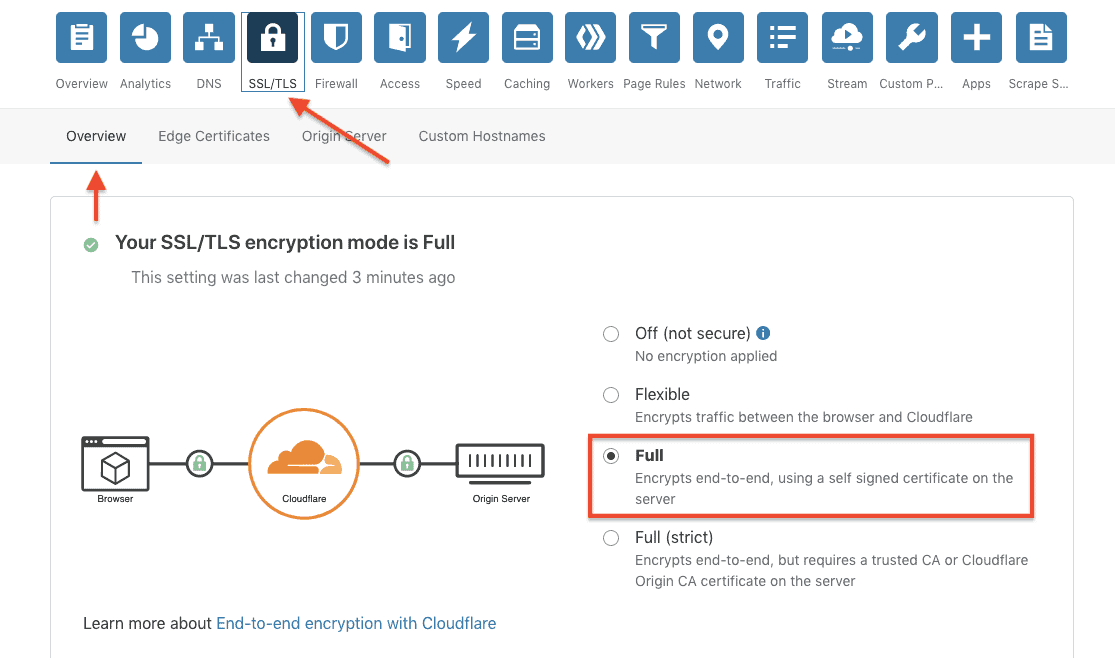
Managing your server is done within the RunCloud dashboard. You can schedule backups, setup Let’s Encrypt, monitor server usage, clone sites and use staging areas (features depend on the plan you’re on).
Enjoy your new cheap and fast WordPress cloud hosting setup!
Here are the speed improvements I got for a website I recently moved over to UpCloud’s $5/month 1GB server:
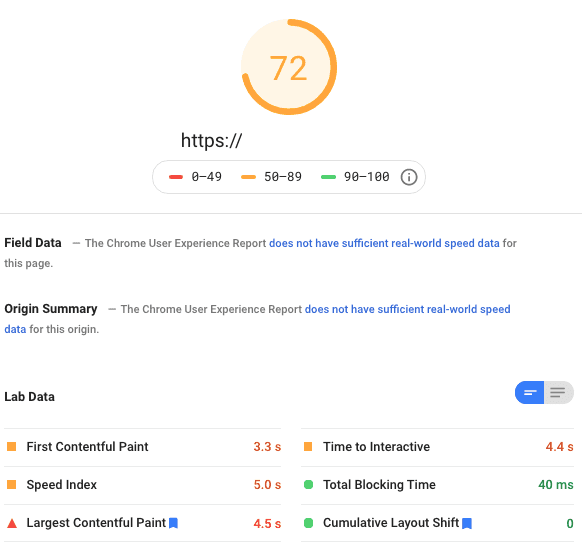
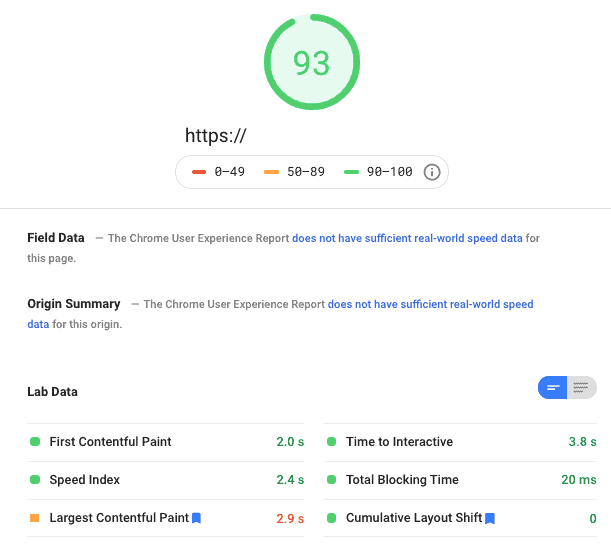
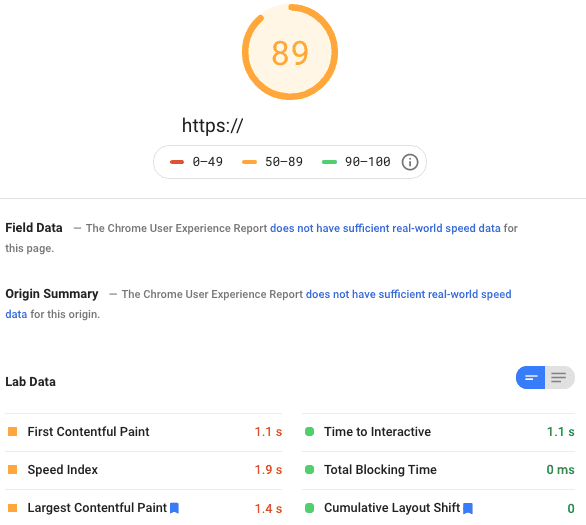
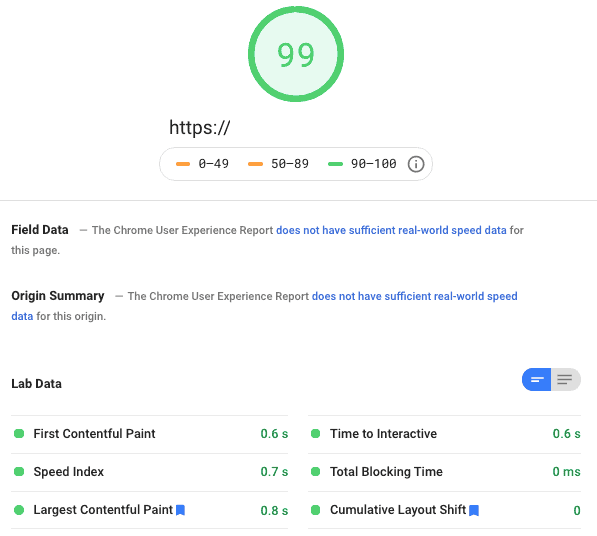
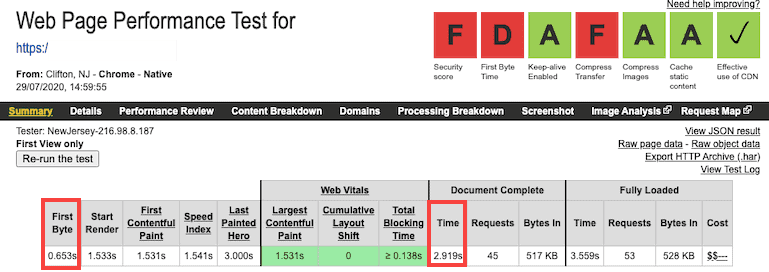
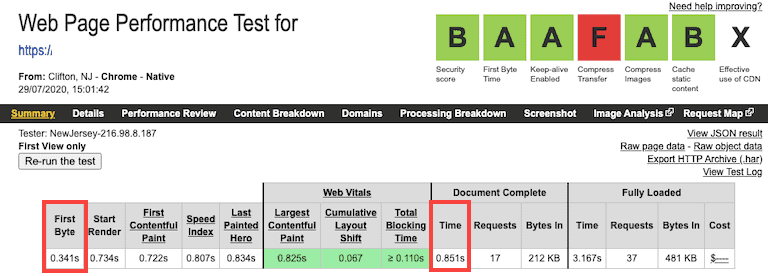
Pretty fast, eh? I do recommend upgrading to one of RunCloud’s premium accounts to access more features, especially if you want to manage more than one website or server.
For more WordPress speed advice, you may get something from reading my guide on how to speed up your WordPress site for free, and our rundown of the fastest WordPress themes you can use.

